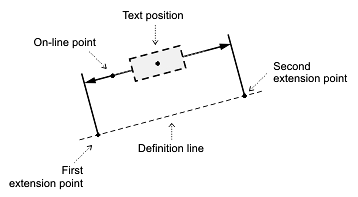
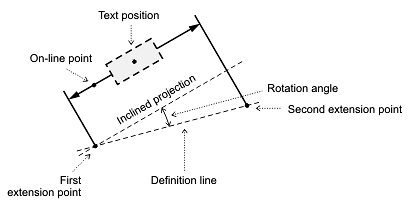
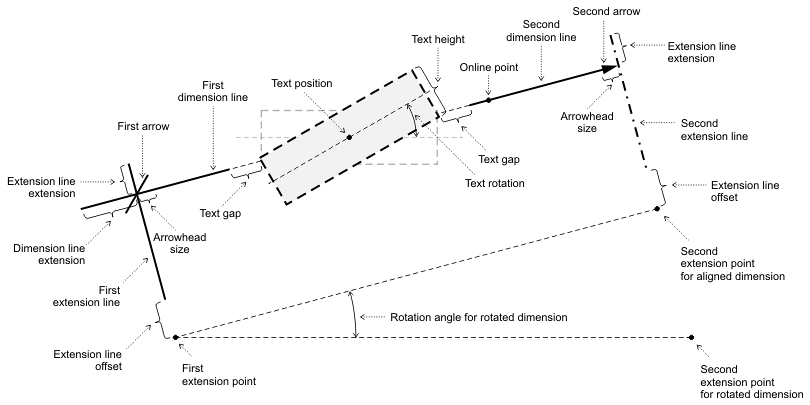
Linear dimensions measure and represent the length between two points as a dimension entity in primary and alternate units. To define the placement, a linear dimension entity requires the first extension point from which the length is measured and the first extension line begins, the second extension point up to which the length is measured and from which the second extension line begins, a point on the line through which the dimension lines pass, a text point in which the dimension text box is placed, an oblique angle which defines the slope of a dimension, and the normal which orients the dimension in WCS. The straight line that connects the first point with the second point is the definition line. A linear dimension entity can be rotated, scaled, and oriented in WCS.
Linear dimension entities can be measured in two ways:
- Aligned dimension — The dimension line is parallel
to the definition line, extension lines are perpendicular to both the dimension
line and definition line, and the measurement is the straight distance between
the first and second extension points along the definition line. As a result,
aligned dimensions obtain the length of the definition line.
- Rotated dimension — The dimension line is rotated relative to the definition line, extension lines are perpendicular to the dimension line (not the definition line), and the measurement is the distance between the extension lines at the point that they are perpendicular. As a result, rotated dimensions obtain the length of the inclined projection of the definition line.
Elements of a linear dimension
A linear dimension entity consists of the following elements:
- Two dimension lines — Straight lines that pass through the on-line point and meet the extension lines perpendicularly. When dimension lines are placed inside extension lines, the first dimension line is drawn from the middle to the first extension line, and the second dimension line is drawn from the middle to the second extension line. When dimension lines are placed outside of extension lines, they can be connected by the forced line or can be open-ended. Dimension lines can finish at a distance beyond extension lines using a dimension line extension. Both dimension lines have color, lineweight, and linetype properties independent of the entity's properties. Each dimension line has its own visibility setting and arrowhead. Each arrowhead can be set either from the fixed list of arrowhead types or can be defined by a block. The size is the same for each arrowhead.
- Two extension lines — Straight lines that begin at extension points and meet at the dimension lines. The first extension line is drawn from the first extension point to the end of the first dimension line. The second extension line is drawn from the second extension point to the end of the second dimension line. Both extension lines can begin at an offset distance from the extension points, and both extension lines can finish at an extended distance beyond the dimension lines. Both extension lines have color and lineweight independent of the entity's properties. Each extension line has its own visibility setting.
- Dimension text box — A linear structure that consists of the required primary measured value, optional alternate measured value, optional primary and alternate tolerance value, optional primary and alternate prefix, and optional primary and alternate suffix. The dimension text box can be centered between or located above dimension lines; aligned horizontally or along dimension or extension lines; offset from the dimension, extension, or leader line; rotated; and scaled.
- Optional leader line — When the dimension text box is placed beyond the dimension or extension lines, a leader line can be drawn from the dimension line to the dimension text box margin. The leader line does not have an arrowhead but shows the link between the dimension line and the dimension text box.
The common structure of a linear dimension entity is defined by the text movement, text fit, and text position relative to the dimension and extension lines (inside or outside).
Text movement
Dimension text can be moved, but result can vary depending on the Dimtmove value. Dimtmove can be set to one of the following values:
- 0 — When set to 0, the dimension text box is always placed either
between or beside the dimension or extension lines. If the dimension text
box moves, the dimension lines also move, and vice versa, if the dimension
lines move along the extension line, the dimension text box also moves. If
the dimension text box moves outside of the extension lines, the dimension
lines are drawn together and the leader line is drawn from the end of a dimension
line to the dimension text box margin. Extension lines are stationary.
If there is not enough space between extension lines to place text and arrowheads, the text box, the arrowheads, or both the text box and arrowheads are placed automatically outside of the extension lines according to the current fit.
When the dimension text box is placed inside and the arrowheads are placed outside, the dimension lines are drawn outside the extension lines.
When the dimension text box is placed outside and the arrowheads are placed inside, the dimension lines are drawn together inside and the leader line is drawn outside, connecting the dimension line to the dimension text box.
When the dimension text box and the arrowheads are placed outside, the dimension lines are drawn from the outside to the extension lines, including the leader line, and the forced line that connects the two dimension lines are drawn between the extension lines. The forced line can be omitted. If the dimension text box is placed above a dimension line, the leader line connects along the dimension text box.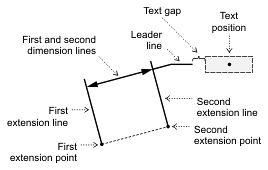

- 1 — When set to 1, the dimension text box can be placed independently
from the dimension lines. The leader line is drawn from the middle of dimension
lines to the dimension text box margin. The placement of dimension lines and
arrowheads is defined by the available space between extension lines, as described
above.

- 2 — When set to 2, the dimension text box can be placed anywhere, independent of dimension line placement and movement. The leader line is not drawn, but a forced line can be drawn.
For working with linear dimension objects, use the OdDbAlignedDimension and OdDbRotatedDimension classes, which represent aligned and rotated dimensions and allow users to access linear dimension entities and manipulate their properties. The OdDbAlignedDimensionPtr and OdDbRotatedDimensionPtr classes are the typified smart pointers to an instances of those entities, and they are used for storing and passing references to the linear dimension objects.
To create and initialize a new instance of a linear dimension entity, see Overview of Specific Entities.
The main methods of the OdDbAlignedDimension class are listed below:
- xLine1Point() — Returns the start point of the first extension line as an object of the OdGePoint3d class.
- setXLine1Point() — Sets a new start point of the first extension line; requires an object of the OdGePoint3d class as a new point.
- xLine2Point() — Returns the start point of the second extension line as an object of the OdGePoint3d class.
- setXLine2Point() — Sets a new start point of the second extension line; requires an object of the OdGePoint3d class as a new point.
- dimLinePoint() — Returns the point defining the location of the dimension line as an object of the OdGePoint3d class.
- setDimLinePoint() — Sets a new point defining the location of the dimension line; requires an object of the OdGePoint3d class as a new point.
- oblique() — Returns the oblique angle as a double value.
- setOblique() — Sets a new oblique angle; requires one double value to specify the new angle.
The main methods of the OdDbRotatedDimension class are listed below:
- xLine1Point() — Returns the start point of the first extension line as an object of the OdGePoint3d class.
- setXLine1Point() — Sets a new start point of the first extension line; requires an object of the OdGePoint3d class as a new point.
- xLine2Point() — Returns the start point of the second extension line as an object of the OdGePoint3d class.
- setXLine2Point() — Sets a new start point of the second extension line; requires an object of the OdGePoint3d class as a new point.
- dimLinePoint() — Returns the point defining the location of the dimension line as an object of the OdGePoint3d class.
- setDimLinePoint() — Sets a new point defining the location of the dimension line; requires an object of the OdGePoint3d class as a new point.
- rotation() — Returns the rotation angle as a double value.
- setRotation() — Sets a new rotation angle; requires one double value to specify the new angle.
- oblique() — Returns the oblique angle as a double value.
- setOblique() — Sets a new oblique angle; requires one double value to specify the new angle.
The next example demonstrates how to work with an aligned dimension entity.
// Create two poits to measure the length between them
OdGePoint3d line1Pt, line2Pt;
line1Pt.x  = 5;
line1Pt.y  = 6;
line2Pt    = line1Pt + OdGeVector3d(3.0, 2.0, 0.0);

// Create the line between those points
OdDbLinePtr  pLine  = OdDbLine::createObject();
pLine->setDatabaseDefaults(bBTR->database());
bBTR->appendOdDbEntity(pLine);
pLine->setStartPoint(line1Pt);
pLine->setEndPoint(line2Pt);

// Create alined dimension
OdDbAlignedDimensionPtr pDimension = OdDbAlignedDimension::createObject();
pDimension->setDatabaseDefaults(bBTR->database());
bBTR->appendOdDbEntity(pDimension);

// Create the point threw which the dimension line will be drawn
OdGePoint3d dimLinePt;
dimLinePt.x = 10;
dimLinePt.y = 7;

pDimension->setXLine1Point(pLine->startPoint());
pDimension->setXLine2Point(pLine->endPoint());
pDimension->setDimLinePoint(dimLinePt);
pDimension->useDefaultTextPosition();
// Set text rotation angle
pDimension->setTextRotation(1);
// Set DIMTMOVE system variable to "1"
pDimension->setDimtmove(1);
// Set objique angle - it is the angle between the extension lines and perpendiculars to the dmension line
pDimension->setOblique(2);
The next example demonstrates how to work with a rotated dimension entity.
// Create two poits to measure the length between them
OdGePoint3d line1Pt, line2Pt;
line1Pt.x  = 10;
line1Pt.y  = 6;
line2Pt    = line1Pt + OdGeVector3d(3.0, 2.0, 0.0);

// Create the line between those points
OdDbLinePtr  pLine  = OdDbLine::createObject();
pLine->setDatabaseDefaults(bBTR->database());
bBTR->appendOdDbEntity(pLine);
pLine->setStartPoint(line1Pt);
pLine->setEndPoint(line2Pt);

// Create rotated dimension
OdDbRotatedDimensionPtr pDimension = OdDbRotatedDimension::createObject();
pDimension->setDatabaseDefaults(bBTR->database());
bBTR->appendOdDbEntity(pDimension);

// Create the point threw which the dimension line will be drawn
OdGePoint3d dimLinePt;
dimLinePt.x = 15;
dimLinePt.y = 7;

pDimension->setXLine1Point(pLine->startPoint());
pDimension->setXLine2Point(pLine->endPoint());
pDimension->setDimLinePoint(dimLinePt);
pDimension->useDefaultTextPosition();
// Set rotation angle
pDimension->setRotation(1);
See Also
Overview of Angular Dimensions
Overview of Arc-Length Dimensions
Overview of Diametric Dimensions
Overview of Ordinate Dimensions
Overview of Radial Large Dimensions
Copyright © 2002 – 2020. Open Design Alliance. All rights reserved.
|