Edge's model
The edge's model property allows to choose which kind of edges to display: object isolines or facet edges. Also it is possible to disable display of isolines and faces edges together.
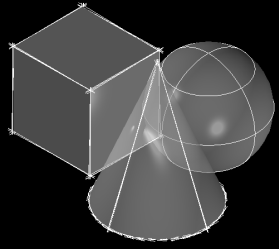
Isolines
To allow isolines edges displaying, use this kind of code:
pVStyle->setTrait(OdGiVisualStyleProperties::kEdgeModel, (OdInt32)OdGiVisualStyleProperties::kIsolines);
Face Edges
To allow faces edges displaying, use this kind of code:
pVStyle->setTrait(OdGiVisualStyleProperties::kEdgeModel, (OdInt32)OdGiVisualStyleProperties::kFacetEdges);
Silhouettes
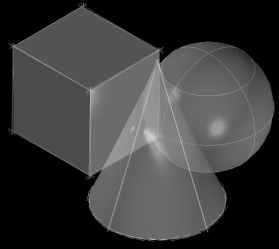
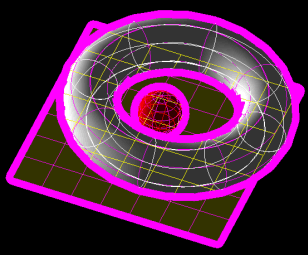
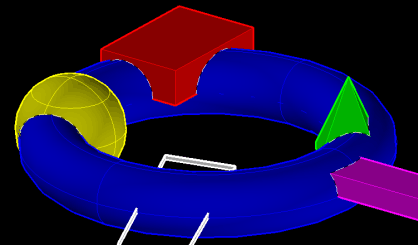
With silhouettes it is possible to get more detailed and clear image. Silhouettes can be generated for any 3d object in runtime, so no geometry regeneration is required to draw them.
Usage of silhouettes in the Hidden Line visual style
Usage of silhouettes in the Shaded visual style
To enable the silhouettes modification set the kSilhouette flag in the kEdgeStyles property. This flag allows to change the silhouette's color by the kEdgeSilhouetteColor property, and silhouette's line width by the kEdgeSilhouetteWidth property:
// Get the current value of the kSilhouette flag
bool silhouetteFlag = pVStyle->traitFlag(OdGiVisualStyleProperties::kEdgeStyles, OdGiVisualStyleProperties::kSilhouetteFlag);
// Check if the kSilhouette flag is enabled, and enable it if not.
if (!silhouetteFlag)
  pVStyle->setTraitFlag(OdGiVisualStyleProperties::kEdgeStyles, OdGiVisualStyleProperties::kSilhouetteFlag);
// Set the color and width properties of the edge's silhouettes
OdCmColor silhouetteColor(OdCmEntityColor::kByColor);
silhouetteColor.setRGB(255, 0, 100);
pVStyle->setTrait(OdGiVisualStyleProperties::kEdgeSilhouetteColor, &silhouetteColor);
pVStyle->setTrait(OdGiVisualStyleProperties::kEdgeSilhouetteWidth, (OdInt32)10);
Halo gap effect
Halo gap effect is a type of silhouette. It is useful to be displayed when an object is hidden by another object. Halo gaps are always displayed using background color. The difference between silhouettes and halo gaps is that halo gaps are rendered separately for each object. To enable the halo gap effect set the kHaloGap flag in the kEdgeModifiers property:
// Get the current value of the kEdgeHaloGap flag
bool haloGapFlag = pVStyle->traitFlag(OdGiVisualStyleProperties::kEdgeModifiers, OdGiVisualStyleProperties::kEdgeHaloGapFlag);
// Check if the kEdgeHaloGap flag is enabled. If not - set the kEdgeHaloGap flag and enable the halo gap effect
if (!haloGapFlag)
  pVStyle->setTraitFlag(OdGiVisualStyleProperties::kEdgeModifiers, OdGiVisualStyleProperties::kEdgeHaloGapFlag);
pVStyle->setTrait(OdGiVisualStyleProperties::kEdgeHaloGap, (OdInt32)7);
Enable obscured edges
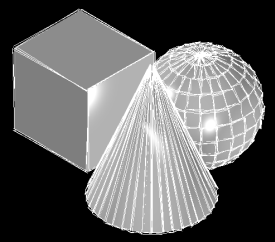
Obscured edges also can be called Hidden Edges. Visual styles provide the ability to display lines hidden by object itself, or by another object. It is additionally possible to choose a color (kEdgeObscuredColor property) and line pattern (kEdgeObscuredLinePattern property) for hidden edges visualization.
Note: To allow the obscured edges, set the kObscured flag in the kEdgeStyles property.
// Get the current value of the kObscured flag
bool obscuredFlag = pVStyle->traitFlag(OdGiVisualStyleProperties::kEdgeStyles, OdGiVisualStyleProperties::kObscuredFlag);
// Check if the kObscured flag is enabled. If not - set the kObscured flag and enable the obscure edges displaying
if (!obscuredFlag)
  pVStyle->setTraitFlag(OdGiVisualStyleProperties::kEdgeStyles, OdGiVisualStyleProperties::kObscuredFlag);
// Set the color of hidden edges
OdCmColor obscuredColor(OdCmEntityColor::kByBlock);
pVStyle->setTrait(OdGiVisualStyleProperties::kEdgeObscuredColor, &obscuredColor);
// Set the line pattern of hidden edges
pVStyle->setTrait(OdGiVisualStyleProperties::kEdgeObscuredLinePattern, (OdInt32)OdGiVisualStyleProperties::kLongDash);
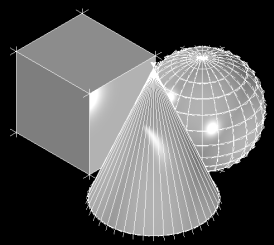
Displaying without obscured edges

Displaying with enabled obscured edges
Display always on top
In drawings edges can be displayed always on the top of faces. This mode is very close to obscured edges behavior, but in this case edges color and other properties will be unchanged. To enable displaying edges on the top of faces set the kAlwaysOnTop flag in the kEdgeModifiers property.
bool alwaysOnTopFlag = pVStyle->traitFlag(OdGiVisualStyleProperties::kEdgeModifiers, OdGiVisualStyleProperties::kAlwaysOnTopFlag);
if (!alwaysOnTopFlag)
  pVStyle->setTraitFlag(OdGiVisualStyleProperties::kEdgeModifiers, OdGiVisualStyleProperties::kAlwaysOnTopFlag);
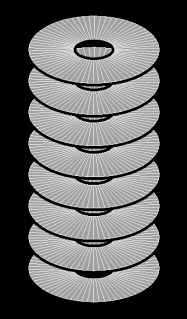
Crease angle
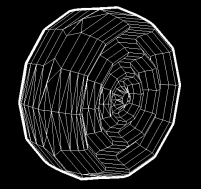
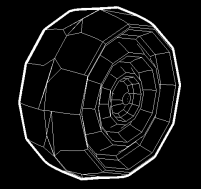
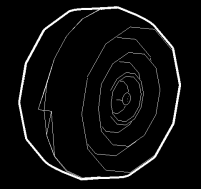
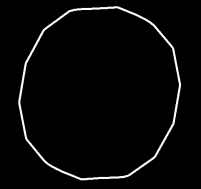
One of the parameters applicable for face edges only is a crease angle. Using the kEdgeCreaseAngle property allows to filter out edges with less angle between faces. Images below show changes of the object detailization with the value of crease angle between 0 and 180 degree.
0 degree
40 degree
80 degree
180 degree
The crease angle is measured as double value in radians. Example below shows how to set the crease angle property.
pVStyle->setTrait(OdGiVisualStyleProperties::kEdgeCreaseAngle, 2.5);
Width and color override
Using visual styles it is possible to override some properties of edges, like color and width. To change an edge color, use the kEdgeColor property. To change an edge width, use the kEdgeWidth property. Be sure that the kEdgeColor and kEdgeWidth flags in the kEdgeModifiers property are set to allow displaying the edges color and width.
// Get current values of the kEdgeWidth and kEdgeColor flags
bool edgeWidthFlag = pVStyle->traitFlag(OdGiVisualStyleProperties::kEdgeModifiers, OdGiVisualStyleProperties::kEdgeWidthFlag);
bool edgeColorFlag = pVStyle->traitFlag(OdGiVisualStyleProperties::kEdgeModifiers, OdGiVisualStyleProperties::kEdgeColorFlag);
// If the kEdgeWidth or kEdgeColor flags are not enabled, enable them
if (!edgeWidthFlag)
  pVStyle->setTraitFlag(OdGiVisualStyleProperties::kEdgeModifiers, OdGiVisualStyleProperties::kEdgeWidthFlag);
if (!edgeColorFlag)
  pVStyle->setTraitFlag(OdGiVisualStyleProperties::kEdgeModifiers, OdGiVisualStyleProperties::kEdgeColorFlag);
// Set the new values of edge's color and width properties
OdCmColor edgeColor(OdCmEntityColor::kByColor);
edgeColor.setRGB(255, 0, 255);
pVStyle->setTrait(OdGiVisualStyleProperties::kEdgeColor, &edgeColor);
pVStyle->setTrait(OdGiVisualStyleProperties::kEdgeWidth, (OdInt32)7);
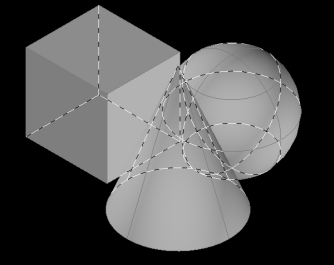
Intersection edges
Intersection edges property gives the possibility to highlight intersections between construction elements. To display intersection edges, set the kIntersection flag in the kEdgeStyles property. If the displaying of intersection edges is enabled it is possible to change a color and line pattern of intersection edges. For this use the kEdgeIntersectionColor and kEdgeIntersectionLinePattern properties. In the image below intersection edges are shown using dashed polylines.
// Get the current value of the kIntersection flag
bool edgeIntersectionFlag = pVStyle->traitFlag(OdGiVisualStyleProperties::kEdgeStyles, OdGiVisualStyleProperties::kIntersectionFlag);
// If the kIntersection flag is not enabled, enable it
if (!edgeIntersectionFlag)
  pVStyle->setTraitFlag(OdGiVisualStyleProperties::kEdgeStyles, OdGiVisualStyleProperties::kIntersectionFlag);
// Set new values of intersection edge's color and line pattern
OdCmColor edgeIntersectionColor(OdCmEntityColor::kForeground);
pVStyle->setTrait(OdGiVisualStyleProperties::kEdgeIntersectionColor, &edgeIntersectionColor);
pVStyle->setTrait(OdGiVisualStyleProperties::kEdgeIntersectionLinePattern, (OdInt32)OdGiVisualStyleProperties::kMediumDash);
Overhang and jitter effects
Overhang edges effect can be used to extend geometry edges during rendering. Jitter edges effect can be used to draw some copies of original edges with small offsets (jitter). Together this two effects can be used to draw the Sketchy visual style. Geometry with this visual style will be drawn as hand-sketch.
Note: Overhang and jitter effects are not applied to analytic curves like spline, circle, arc.
The kEdgeJitterAmount and kEdgeOverhang properties are used to modify overhang and jitter effects in a drawing. To allow the displaying those effects set the kEdgeOverhang and kEdgeJitter flags in the kEdgeModifiers property.
// Get current values of the kEdgeOverhang and kEdgeJitter flags
bool edgeOverhangFlag = pVStyle->traitFlag(OdGiVisualStyleProperties::kEdgeModifiers, OdGiVisualStyleProperties::kEdgeOverhangFlag);
bool edgeJitterFlag = pVStyle->traitFlag(OdGiVisualStyleProperties::kEdgeModifiers, OdGiVisualStyleProperties::kEdgeJitterFlag);
// If the kEdgeOverhang and kEdgeJitter flags are not enabled, enable them
if (!edgeOverhangFlag)
  pVStyle->setTraitFlag(OdGiVisualStyleProperties::kEdgeModifiers, OdGiVisualStyleProperties::kEdgeOverhangFlag);
if (!edgeJitterFlag)
  pVStyle->setTraitFlag(OdGiVisualStyleProperties::kEdgeModifiers, OdGiVisualStyleProperties::kEdgeJitterFlag);
// Set new values for edge's overhang and jitter effects
pVStyle->setTrait(OdGiVisualStyleProperties::kEdgeOverhang, (OdInt32)5);
pVStyle->setTrait(OdGiVisualStyleProperties::kEdgeJitterAmount, (OdInt32)OdGiVisualStyleProperties::kJitterMedium);
Overhang
Jitter
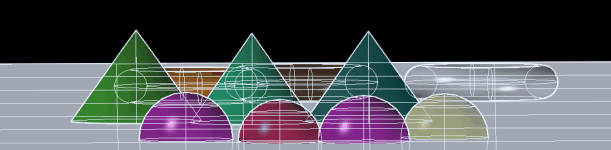
Edges opacity override
Edges opacity can be useful together with a faces opacity, or in case if line width is large. In case if the edges opacity enabled, the geometry, which is drawn under them, will be visible through this semitransparent edges. To change the edges opacity use the kEdgeOpacity property. To display the edges opacity be sure that the kEdgeOpacity flag is enabled in the kEdgeModifiers property.
bool edgeOpacityFlag = pVStyle->traitFlag(OdGiVisualStyleProperties::kEdgeModifiers, OdGiVisualStyleProperties::kEdgeOpacityFlag);
if (!edgeOpacityFlag)
  pVStyle->setTraitFlag(OdGiVisualStyleProperties::kEdgeModifiers, OdGiVisualStyleProperties::kEdgeOpacityFlag);
pVStyle->setTrait(OdGiVisualStyleProperties::kEdgeOpacity, 0.3);
Faces opacity only
Faces opacity vs. Edges opacity