Drawings SDK provides several methods for configuring an image.
Configuring an image definition object
Checking whether an image is loaded
To check whether the source image is loaded in an image definition object, use the isLoaded() method, which returns true if the image is loaded or false otherwise. For example:
odPrintConsoleString(L"\nSource image is %s", pImageDef->isLoaded()? L"loaded" : L"not loaded");
Checking the image size
To check the size of an image, use the size() method, which returns the size of the image in pixels as an object of the OdGeVector2d class. For example:
odPrintConsoleString(L"\nSize = %f , %f", pImageDef->size().x, pImageDef->size().y);
Checking the source image name
To check the source image name, use the sourceFileName() method, which requires no parameters and returns the source image name as an OdString value. For example:
odPrintConsoleString(L"\nSource File Name is %s", pImageDef->sourceFileName().c_str());
Unloading an image
If an image does not need to be displayed, you can unload it using the unload() method. The method requires one bool parameter to specify whether or not the undo recording will be done for the object ("true" by default). For example:
pImageDef->unload();
Configuring an image object
Configuring image display options
You can configure and check an image's display options, which are stored in the OdDbRasterImage::ImageDisplayOpt enumeration:
enum ImageDisplayOpt {
  kShow = 1,			// Show an image
  kShowUnAligned = 2,	// Show the rotated image
  kClip = 4,			// Clip an image
  kTransparent = 8		// Use the transparent background for an image
};
To set or unset a display option, use the setDisplayOpt() method, which requires two parameters: one value from the ImageDisplayOpt enumeration as an image display option index and a bool value as its flag. For example:
pImage->setDisplayOpt(OdDbRasterImage::kShow, true);
To check the flag of a display option, use the isSetDisplayOpt() method, which requires one value from the ImageDisplayOpt enumeration and returns its state as a bool value. For example:
odPrintConsoleString(L"\n kShow option is %s", pImage->isSetDisplayOpt(OdDbRasterImage::kShow)? L"On" : L"Off");
Getting and setting image orientation
To get the origin point and u- and v-vectors of an image, use the getOrientation() method, which requires an OdGepoint3d object for returning the origin point and two OdGeVector3d objects for returning the u- and v- direction of the image and also to define its width and height (don't confuse this with pixel size). For example:
OdGePoint3d origin; OdGeVector3d u,v;
pImage->getOrientation(origin,u,v);
odPrintConsoleString(L"\nOrigin = %f %f %f", origin.x, origin.y, origin.z);
odPrintConsoleString(L"\nU = %f %f %f", u.x, u.y, u.z);
odPrintConsoleString(L"\nV = %f %f %f", v.x, v.y, v.z);
To set new orientation values, use the setOrientation() method, which requires an OdGePoint3d object as the new origin point and two OdGeVector3d objects as the new u- and v- vectors, which define its width and height. For example:
pImage->setOrientation(OdGePoint3d(0,0,5), OdGeVector3d(50, 0, 0), OdGeVector3d(0, 50, 0));;
Getting and setting the brightness, contrast and fade
To check the brightness, contrast and fade values, use the brightness(), contrast() and fade() methods, which return these values as OdInt8 values in the range [0 .. 100] (the default value is 50 for brightness and contrast and 0 for fade). For example:
odPrintConsoleString(L"\nBrightness value is %i", pImage->brightness());
odPrintConsoleString(L"\nContrast value is %i", pImage->contrast());
odPrintConsoleString(L"\nFade value is %i", pImage->fade());
To set new values for image brightness, contrast and fade, use the setBrightness(), setContrast() and setFade() methods, which require one OdInt8 value as a new value for these options. For example:
pImage->setBrightness(20);
pImage->setContrast(80);
pImage->setFade(30);
Getting image frame coordinates
To get the coordinates of an image's corners, use the getVertices() method, which returns the corner points as an OdGePoint3dArray object. For example:
OdGePoint3dArray vertices;
pImage->getVertices(vertices);
for (int i = 0; i < vertices.size(); i++)
{
  odPrintConsoleString(L"\nPoint[%i] = %f %f %f", i, vertices[i].x, vertices[i].y, vertices[i].z);
}
Getting the image size
To get the size of an image, use the imageSize() method, which requires one bool value to define the source of the data — from the ImageDef object (default choice) or from the cached value — and returns the size as an OdGeVector2d object. For example:
OdGeVector2d imSize = pImage->imageSize();
odPrintConsoleString(L"\nImage Size = %f %f", imSize.x, imSize.y);
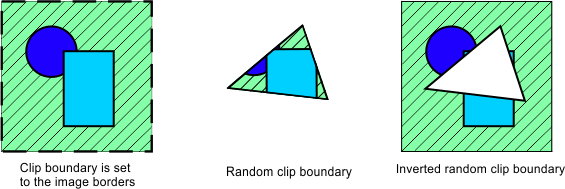
Using clipping boundaries
A raster image can be clipped and set with a clipping boundary. To check whether an image is clipped, use the isClipped() method which returns the clipping flag as a bool value. For example:
odPrintConsoleString(L"\nImage is %s", pImage->isClipped()? L"clipped" : L"not clipped");
The clipping type is stored in the ClipBoundaryType enumeration:
enum ClipBoundaryType {
  kInvalid,				// No valid clip boundary exists
  kRect,				// Rectangular clip boundary
  kPoly					// random form clip boundary
};

To check the type of clip boundary, use the clipBoundaryType() method which returns the type as a value of the ClipBoundaryType enumeration. For example:
odPrintConsoleString(L"\nClip Boundary Type = %i", pImage->clipBoundaryType());
To set the clip boundary to the image boundary, use the setClipBoundaryToWholeImage() method. For example:
pImage->setClipBoundaryToWholeImage();
To set a random clip boundary, use the setClipBoundary() method, which requires an array of 2D points in pixel coordinates. For example:
OdGePoint2dArray clip;
clip.setLogicalLength(4);
clip[0].x = 120; clip[0].y = 0;
clip[1].x = 250; clip[1].y = 500;
clip[2].x = 500; clip[2].y = 200;
clip[3].x = 120; clip[3].y = 0;
pImage->setClipBoundary(clip);
To get the points of the clip boundary, use the clipBoundary() method, which returns the clip boundary points as an array of 2D points in pixel coordinates. For example:
OdGePoint2dArray clipArr =  pImage->clipBoundary();
for (int i = 0; i < clipArr.size(); i++)
{
  odPrintConsoleString(L"\nClip Point[%i] = %f %f", i, clipArr[i].x, clipArr[i].y);
}
The clip boundary can be inverted. To invert it, use the setClipInverted(), which requires one bool value for specifying the inversion type. For example:
pImage->setClipInverted(true);
To check the clip inversion flag, use the isClipInverted() method, which returns the clip inversion flag as a bool value. For example:
odPrintConsoleString(L"\nClip boundary is %s", pImage->isClipped()? L"inverted" : L"not inverted");
See Also
Copyright © 2002 – 2021. Open Design Alliance. All rights reserved.
|